5Sixty3 Sound

Dubuque's only High Quality Car Audio and Electronics Retailer and Installation Facility

3366 Center Grove Drive - Suite 4 - Dubuque, IA 52003 563-239-1931
  • Home
  • Services
    • Car Audio
    • Custom Installation
    • Marine Audio
    • Remote Starters
    • Safety Cameras
  • Brands
    • Audio Dynamics
    • Under Construction
  • About Us
  • Location
  • Contact Us
  • Facebook

Product Spotlight: ADS iDatalink Maestro APX Kits

Maestro APX

In February of 2025, Automotive Data Solutions (ADS) introduced the world to a new way of installing car radios. In their presentation, they discussed how aftermarket source unit installations evolved from under-dash to DIN and, subsequently, 2-DIN shapes. Their iDatalink Maestro APX kits, when combined with radios from JVC and Kenwood, usher in a new philosophy in radio upgrade options. Let’s check out the iDatalink Maestro APX installation kits.

The Basics of Radio Installations

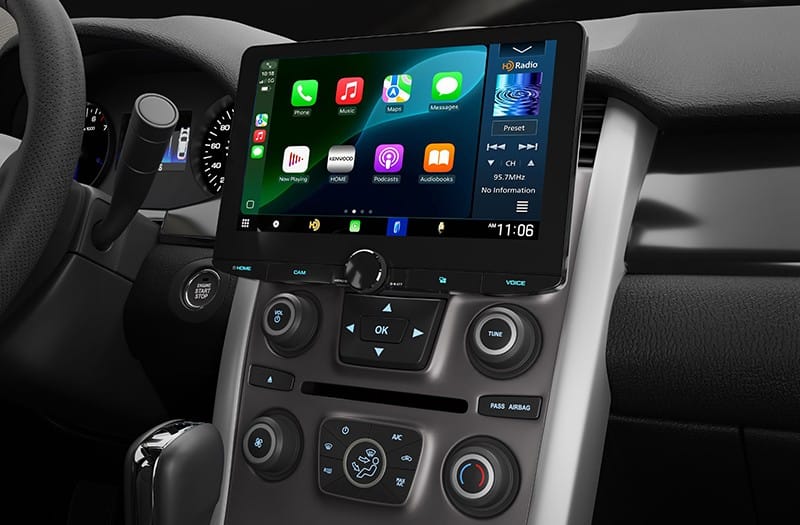
Up until now, if you wanted to replace a factory-installed radio, you had a choice between DIN and 2-DIN radio chassis. An extension of these sizes includes floating-face radios with a large screen mounted on a bracket in front of the dashboard.

ADS spends significant resources cataloging vehicle information as it investigates each platform for remote car starter and vehicle interface solutions. The team noticed that many vehicles share common parts, such as screens. If a radio manufacturer could produce an aftermarket solution, ADS could provide simple installation and integration solutions to allow consumers to dramatically upgrade their cars and trucks in terms of features and performance.

ADS contacted their long-time partners at JVCKENWOOD to ask if they wanted to be the initial source unit partners for the APX Advanced Dash Integration product. ADS and JVCKENWOOD worked together on the initial Maestro RR radio data integration project. The two companies agreed, and work began several years ago on developing the APX kits and compatible radios. As a side note, JVC and Kenwood call their APX-compatible radio family Direct Replacement.

Maestro APX
A Kenwood DAX800XR radio installed in the dash of a 2017 infiniti QX60 SUV using the Maestro APX-S8-IN1 kit.

How Does Maestro APX Work?

In a conventional radio upgrade, a mobile enhancement retailer replaces the factory radio and often the trim panel with aftermarket solutions. The new dash kit has an opening for a single-DIN or, more commonly, a 2-DIN multimedia receiver. Some of these dash kits are complicated and expensive, and have to include new displays and interfaces for climate controls. Due to space limitations on the dashboard, many kits relocate the radio to a lower, less convenient location. Another drawback is that the radio display often shrinks from 8 inches to 7 inches or less. However, vehicle owners can now have state-of-the-art audio playback and smartphone integration, ready for connection to signal processors, amplifiers, and high-quality speakers.

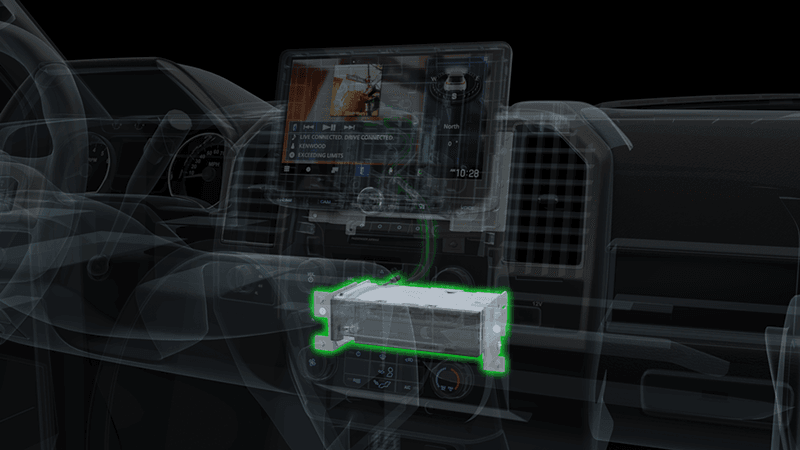
The Maestro APX kits include two components – mounting brackets for a screen and a T-harness. The harness handles connections to the factory wiring and to a Maestro RR or RR2 interface. The brackets allow the new screen included with the Kenwood or JVC radio to mount in or in front of the dash. In short, the new radio replaces the factory screen with a premium source unit.

Maestro APX
A Maestro RR or RR2 handles integration with the factory control and allows the radio to display vehicle information from the CAN bus.

Maestro Floating and Eight-Inch Kits

There are two types of APX kits – APX-FL for floating-face radios and APX-S8 for eight-inch display solutions.

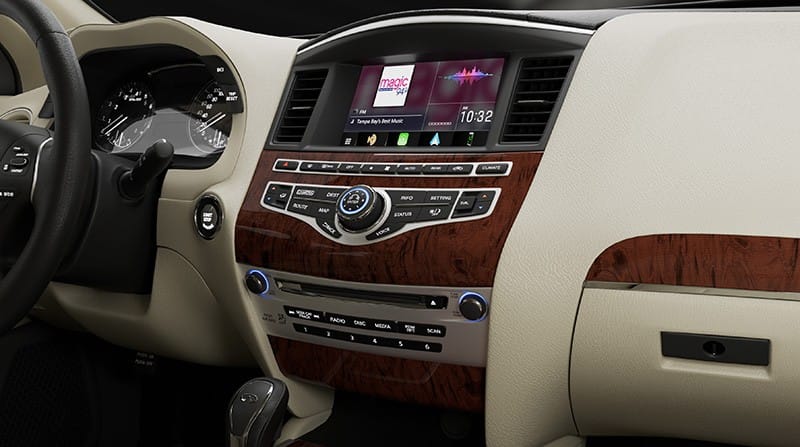
The APX-FL kit, like those for the Jeep Wrangler, allows a radio with a 10.1-inch floating face display to be integrated into the vehicle. Unlike DIN- and 2-DIN floating-face solutions, the radios compatible with the APX-FL kits are a true two-part solution. The radios are designed with a hide-away brain and a screen that attaches with a few harnesses. Depending on the kit, the radio brain may be installed in place of the factory CD mechanism or on the back of the display mounting bracket. Where possible, factory mounting brackets are used, but the Maestro kits include beautifully crafted brackets where needed. Spacer blocks and trim pieces are included so your installer can fit the screen up tight against the dash.

Maestro APX
A Kenwood DAX1050XR installed in a 2014 Ford Edge using the APX-FL-FO1 kit.

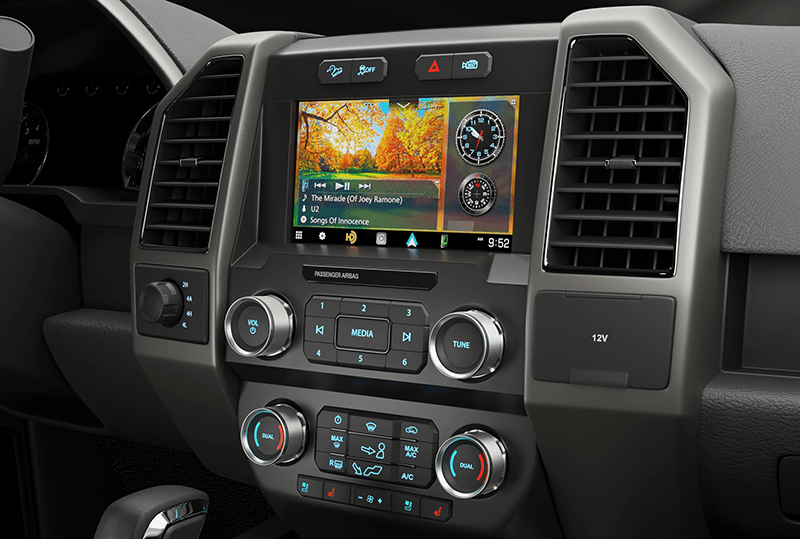
The APX-S8 kits are designed for a two-part radio solution that includes an eight-inch screen that replaces the factory screen. Brackets are provided as needed to ensure the new display fits perfectly into the dash. The result, once the upgrade is complete, is that the dash looks just like it did from the factory. All the radio and climate controls continue to function with the new radio, thanks to the Maestro RR or RR2 integration module. The same goes for the radio control buttons on the steering wheel.

Maestro APX
A Kenwood DAX8000S installed in a Ford F-150 dash using an APX-S8-F01 kit.

APX Kit Applications

As of now, ADS offers kits for many Ford, GM, Chrysler, Jeep, Dodge, Ram, Holden, and Infiniti/Nissan vehicles. You can check the ADS Maestro website to see if there’s a Maestro APX radio upgrade solution for your application. A key benefit of the design is that new kits can be created in the future if a compatible platform emerges.

Maestro APX
An example of how the radio brain is installed in place of the factory CD mechanism in a Ford F-150.

The ADS marketing team noted that there are almost five million vehicles on the road globally compatible with their Maestro APX kits, opening up new technology-upgrade opportunities for millions of vehicle owners. If you want to upgrade your car or truck, check the ADS Maestro website for a compatible Maestro APX kit, then choose a JVC or Kenwood radio that meets your needs. From there, an authorized dealer for the radio brand can bring your plan to fruition, and you can enjoy all the features of a modern vehicle in your older car, truck or SUV.

This article is written and produced by the team at www.BestCarAudio.com. Reproduction or use of any kind is prohibited without the express written permission of 1sixty8 media.

Filed Under: ARTICLES, Car Audio, PRODUCTS, RESOURCE LIBRARY Tagged With: iDatalink Maestro

Product Spotlight: KICKER KEYLOC

KICKER KEYLOC

There are a dozen or so high-quality line output converters available to help your installer integrate an amplifier into a factory-installed audio system. That said, most of them are simple devices that do nothing more than adjust voltage gain and perhaps apply some equalization to the signal. KICKER’s KEYLOC is a unique solution because it features a built-in digital signal processor that undoes equalization, delays, and all-pass filters applied to the factory signal. The goal is to establish a clean signal that you can build on. Let’s check out the outstanding KICKER KEYLOC.

Basic Features of the KICKER KEYLOC

Let’s start with the basics. The KEYLOC is a two-channel line output converter that can accept up to 10 volts of signal in low-level mode and an impressive 40 volts in high-level mode. In low-level mode, the KEYLOC presents a 60-ohm load to the driving amplifier. Many factory-installed source units and amplifiers will go into protection mode without a proper load. External resistors are available from KICKER if needed for high-level operation. The maximum output of the KEYLOC is 10 volts.

The KEYLOC measures 5.5 by 2.75 inches in footprint and is 1.375 inches thick. A Molex connector on the left side includes two speaker input channels, power and ground connections, and remote turn-on and remote output wiring. The remote output activates automatically when the KEYLOC detects a DC offset voltage on the input speaker wires, enabling an aftermarket amplifier to turn on. There are a pair of RCA output jacks on the right side of the chassis to feed your new amplifier.

The top panel of the KEYLOC features two stereo potentiometers and a display with five LEDs. The pots are for adjusting input sensitivity and output voltage. The LEDs indicate power and are part of the signal testing and KEY processing features of the KEYLOC.

KICKER KEYLOC
The LED display on the front panel of the KEYLOC provides your installer with information about frequency response and correction processing.

Audio Analysis Tool

Depending on the design of your factory audio system, it might be difficult to find a full-range signal. The Low, Mid, and High LEDs on top of the KEYLOC can be used with the provided pink-noise test track to determine whether you have a full-range signal. The Low indicator illuminates when there is sufficient audio information in the 20 Hz to 200 Hz range. The Mid indicator monitors 200 Hz to 2 kHz, and the High LED monitors audio above 2 kHz. If you are missing low- or high-frequency information, the KEY processing will not produce a full-bandwidth signal for your new equipment.

The KEY to Audio Excellence

The KEYLOC uses KICKER’s patent-pending KEY algorithm to analyze a special audio test signal. The signal includes sine sweeps, pink noise, and impulses, which reveal frequency response, signal delay, and all-pass filter processing. Once measured, the KEYLOC applies its own signal processing to eliminate these attributes from the audio signal. The result is a flat frequency response signal that will allow new speakers, amplifiers, and processors to sound amazing. The process is fully automated and takes between two and 10 minutes to complete. Your installer can even temporarily bypass the correction to demonstrate how much the system has improved thanks to the KEYLOC.

KICKER KEYLOC
The KEYLOC is small enough to hide behind the radio in your dash, yet powerful enough to correct even the most complex audio signals.

Why You Need the KICKER KEYLOC

Factory-installed audio systems are typically designed to extract the best possible performance from inexpensive speakers. As such, radios and amplifiers include signal processing such as equalization, delays, and all-pass filters to create an optimized listening experience. Don’t be fooled: this processing is present even in simple “radio-only” systems and isn’t exclusive to premium systems with complex multi-channel amplifiers.

The goal of upgrading a car audio system is, of course, to make it sound better. As such, you are likely to add subwoofers and new speakers to the vehicle. The equalization that worked with the factory speakers is not likely to be ideal for the higher-performance options you’ve chosen. Eliminating factory processing with a product like the KICKER KEYLOC is crucial to achieving great sound in your car, truck, or SUV. The KEYLOC is also great for motorcycles, side-by-sides, and marine applications.

Visit a KICKER Dealer Today

When it’s time to make your vehicle’s stereo sound better, drop by an authorized KICKER retailer to find out whether the KEYLOC is needed to undo the signal processing built into your factory-installed audio system. You can find an authorized KICKER retailer near you using the Dealer Locator on the KICKER website.

Be sure to follow Kicker on Facebook, Instagram and YouTube to keep up with the latest product releases from our friends in Stillwater.

This article is written and produced by the team at www.BestCarAudio.com. Reproduction or use of any kind is prohibited without the express written permission of 1sixty8 media.

Filed Under: ARTICLES, Car Audio, PRODUCTS, RESOURCE LIBRARY Tagged With: KICKER

Product Spotlight: Audison AV 12 D2 II

Audison AV 12 D2 II

Subwoofers with minimal mounting depth requirements continue to grow in popularity. To meet that demand, the team at Audison has introduced a larger, more robust option to complement their well-regarded Prima Series. The new Voce II subwoofer line includes ten- and twelve-inch models engineered for higher power handling and increased excursion. In this spotlight, we’ll take a closer look at the 12-inch Audison AV 12 D2 II.

Audison AV 12 D2 II
Audison includes a heavy-duty mesh grille with each Voce II subwoofer to protect them from damage.

Features of the Voce II Subwoofers

As its name suggests, the AV 12 D2 II is a 12-inch subwoofer. It requires only 3.46 inches of mounting depth, making it an excellent solution for trucks or vehicles where space is at a premium.

The D2 suffix identifies its dual two-ohm voice coil configuration. A dual four-ohm version, designated D4, is also available. Ten-inch Voce II models share the same design principles and construction quality.

Audison rates the AV 12 D2 II at 550 watts continuous and 1100 watts peak power handling. This capability comes from a 1.5-inch six-layer copper-clad aluminum wire voice coil. To help keep the motor assembly cool during extended use, the basket and motor structure incorporate Audison’s Airflow Venting Cooling (A.V.C.) architecture.

The woofer is built on a custom-tooled, cast-aluminum eight-spoke frame. Instead of the traditional vent through the center of the T-yoke, the AV 12 D2 II uses four large vents in the bottom plate below the spider. Combined with the air gaps between the magnet and chassis, these openings form part of the A.V.C. system.

Audison AV 12 D2 II
The heavy-duty basket and integrated A.V.C. features ensure these subwoofers can dish out prodigious amounts of bass and will last for years.

The cone and dust-cap support assembly is a one-piece injection-molded polypropylene structure. The dust-cap face piece is bonded and supported around its perimeter just above the fiberglass voice coil former. This design minimizes unwanted flexing or resonance. Audison refers to this reinforcement method as Radial Reinforced Frameworks (R.R.F.).

A single ferrite magnet serves as the motor structure. The six-layer voice coil is connected via tinsel leads, internally supported by the R.R.F. and externally by large spring-loaded terminals mounted to the chassis. These terminals can accept up to 8-AWG speaker wire for maximum current transfer and include labels for which of the two coils they are connected to. There are wire management tabs built into the terminals as well.

Audison AV 12 D2 II
Cutaway view of the Audison AV 12 D2 II subwoofer.

Specifications of the Audison AV 12 D2 II

Digging into performance parameters, the AV 12 D2 II features a resonant frequency (Fs) of 23 Hz, an equivalent compliance (Vas) of 2.225 cubic feet, and a Total Q (Qts) of 0.5. Cone excursion is rated at 16.8 mm, voice coil inductance is 4.3 millihenries, and sensitivity is 85 dB SPL.

We modeled the driver in BassBox Pro using Audison’s recommended 0.957 cubic foot sealed enclosure. The simulation shows an impressive -3 dB point of 38.4 hertz with a system Q (Qtc) of 0.812. The software also predicts solid cone control down to single-digit frequencies at the rated 550-watt continuous input.

Audison AV 12 D2 II
Predicted free-field frequency response of the Audison AV 12 D2 II subwoofer in a 0.957-cubic-foot sealed enclosure.

Upgrade Your Car Audio System Today with Audison

If you’re shopping for a high-performance subwoofer that delivers excellent output, requires very little mounting depth, and features advanced cooling technologies, the Audison AV 12 D2 II should be on your shortlist. Visit a local authorized Audison retailer to audition the 12-inch model or its 10-inch counterparts. They can help determine the best solution for your vehicle and listening preferences. Find an authorized dealer here.

To learn more about Audison’s Voce II subwoofers and speaker systems, visit their website. Be sure to follow Audison on Facebook, Instagram and YouTube to stay up to date with all their latest product releases.

This article is written and produced by the team at www.BestCarAudio.com. Reproduction or use of any kind is prohibited without the express written permission of 1sixty8 media.

Filed Under: ARTICLES, Car Audio, PRODUCTS, RESOURCE LIBRARY Tagged With: Audison

Product Spotlight: JBL Stadium 62CF

JBL Stadium 62CF

If you have been to a concert, club, or movie theater, you have likely had the chance to experience JBL audio products. With a corporate pedigree that dates back over a century, JBL products are leaders in many market segments, especially portable speakers and car audio products. In this spotlight, we will take a close look at the JBL Stadium 62CF component speaker set.

The Stadium 62CF is a 6.5-inch component speaker set that includes a pair of woofers, a pair of 0.75-inch tweeters, passive crossover networks, mounting adapters for the woofers, and several options for tweeter mounting hardware.

JBL Stadium 62CF
The JBL Stadium 62CF 6.5-inch component speaker set delivers smooth and detailed performance and impressive value.

Woofer Features and Specifications

The woofers are based on a sturdy and rigid injection-molded chassis. An integrated terminal block with large gold-plated Phillips-head set screws handles electrical connections. Up front, the woofers feature a glass-fiber woofer cone and dust cap for a good balance of rigidity and damping. The drivers use the JBL Plus One+ design, which maximizes cone area to improve efficiency and low-frequency extension. These 6.5-inch class drivers have an effective cone area (Sd specification) of 143.14 square centimeters. Comparable products are typically around 120 square centimeters. This is an increase of almost 20%, which means more efficiency and bass output.

The woofers feature a high-roll rubber surround to ensure long-term durability. The speakers are rated for 110 watts of continuous power, with peaks of 330 watts. While we’re discussing specifications, the Stadium 62CF woofer’s mounting depth is 2.125 inches, and the required cutout is 5.125 inches. The Stadium 62CF set is designed as a factory replacement solution and, as such, doesn’t come with grilles for the woofers.

Another unique feature of the Stadium 62CF speakers is that the voice coils are wound to a nominal impedance of three ohms. This helps whatever amplifier you are using produce a little extra power without the impedance being so low as to affect distortion performance. The lower impedance also bumps efficiency, which JBL rates at 93 dB at 2.83 volts measured at 1 meter. This makes the set ideal for installations powered directly by a factory-installed or aftermarket head unit. However, the high power handling also allows the set to be used with a moderately powerful aftermarket amplifier.

JBL Stadium 62CF
The Plus One+ woofer cone design delivers more sound for the same power level, making your music even more fun!

Tweeter and Crossover Features

The tweeters in the Stadium 62CF kit feature an edge-driven aluminum dome design. JBL states that the tweeters will play up to 40 kHz, making them ideal for high-resolution audio systems. The kit includes mounting hardware for flush and surface-mount installations.

The Stadium 62CF kit includes a pair of passive crossover networks housed in slender plastic cases. The crossovers include two switches. The first selects an output level for the tweeter of 0 or -3 dB. This is a good feature if the tweeters are mounted much closer to the listening position than the midrange, and your installer needs to attenuate their output. The second switch selects between two-way and three-way operation. JBL offers a two-inch midrange set, the Stadium 22S, and a three-inch set, the Stadium 32S, which can be paired with the Stadium 62CF to create a three-way system.

JBL Stadium 62CF
The Stadium 62CF set can be upgraded with two- or three-inch midrange kits to improve imaging and staging.

Upgrade Your Car Audio System with JBL Stadium Speakers!

If you are shopping for a speaker system that leverages intelligent features to deliver impressive audio performance, consider the JBL Stadium 62CF set. The JBL Stadium series includes 5.25-inch component speakers, along with 6×9-, 6×8-, 5.25-, and 6.5-inch coaxial models. You can learn more about JBL car audio products by visiting their website and following them on Facebook, Instagram, and YouTube.

This article is written and produced by the team at www.BestCarAudio.com. Reproduction or use of any kind is prohibited without the express written permission of 1sixty8 media.

Filed Under: ARTICLES, Car Audio, PRODUCTS, RESOURCE LIBRARY Tagged With: JBL

Product Spotlight: AudioControl A600.4

AudioControl A600.4

If you have been around the car audio industry for as long as we have, then you have likely used an audio processor in your vehicle. This veteran company is recognized worldwide for its line output converters, equalizers and crossovers. A few decades later, the brand has introduced several series of amplifiers. Their latest offering is the Altitude Series. In this spotlight, we’ll check out the four-channel A600.4 amp.

AudioControl A600.4 Specifications and Features

The A600.4 four-channel amp is rated to produce 100 watts of power per channel when driving four-ohm loads. That output increases to 150 watts per channel when driving two-ohm loads. When each pair of channels is bridged to a four-ohm load, the amp produces 300 watts of power.

With respect to performance, the amp has a THD+N specification of <0.21% and a signal-to-noise ratio of 107 dBA referenced to full power.

Let’s start with a unique feature included in the A600.4 – Valet mode. When a 12-volt signal is applied to the Valet input, the maximum power the amp can produce is reduced to 25% of its maximum output. The malfunction indicator LED will illuminate orange when the amp is in Valet mode. If you are concerned about someone abusing your car audio system, this feature is perfect for keeping your speakers safe.

The A600.4 is also equipped with AudioControl’s Great Turn-On (GTO) circuit. The amp can be activated by applying 12 volts to the remote input. Alternatively, when in GTO mode, the amp will detect the ~6-volt bias on the speaker wires of a factory-installed or aftermarket radio. If your installer is integrating the amp into a vehicle with a full-bridge amplifier, Audio mode will monitor the inputs for the presence of an audio signal to wake the amp up.

Another unique feature of the A600.4 is its use of Linkwitz-Riley alignments on the crossovers. While the slopes are still shallow at 12 dB / Octave, they will sum smoothly around the crossover point because the signal will be -6 dB at the knee frequency. Butterworth crossovers are only at -3 dB at the crossover point, which results in a 3 dB bump when the acoustic signals sum. In short, your system will sound better and have improved clarity around the crossover frequency with this design.

The amplifier is based on an aluminum extrusion and features uniquely styled end-caps for a clean appearance. A removable panel on top of the amp conceals all the signal adjustments and the set screws for the power and speaker connections.

All connections are made along the front edge of the amp using high-quality terminal blocks for 4-AWG power and ground, and 12-AWG speaker wire connections.

AudioControl A600.4
All connections are made along the front edge of the amp for a tidy installation.

Signal Processing Information

Each pair of channels has a sensitivity control that is adjustable from 0.5 to 6 volts on the RCA inputs and 1.5 to 20 volts on the speaker-level inputs. The speaker inputs are on an eight-pin Molex plug, and AudioControl calls this the LC Direct connection. The amp has a two or four-channel input switch. In two-channel mode, the signal on channel 1 (LC Direct or RCA) is copied to channel 3, and the signal on channel 2 is copied to channel 4. This is ideal if you are connecting that amp to something like a Bluetooth streaming device as a signal source. Each pair of channels has a Max input indicator. This LED will illuminate when the input is maximized and should flash occasionally when playing music recorded at high volume levels.

AudioControl A600.4
The A600.4 has clean lines and a modern aesthetic. It’s also small enough to fit under the seat of most vehicles.

The crossover on each pair of channels is adjustable between 50 and 500 Hz, or when the x10 switch is enabled, 500 to 5 kHz. This is enough range to handle subwoofer to midrange speakers, or midrange to tweeters. The crossovers on both channel pairs can operate in high- or low-pass mode to ensure maximum system design flexibility.

The amp has an RCA output terminal that can be used to feed an audio signal to an additional amplifier like the A800.1 800-watt monoblock to power a subwoofer.

Finally, there is a connection for an optional ACR-1 remote level control. When connected, you can adjust the output level of channels 3 and 4 to suit your mood or the music you’ve chosen.

AudioControl A600.4
Controls and set screws for the terminals are concealed behind a removable panel on top of the amplifier.

Upgrade Your Car Audio System with AudioControl

If you are shopping for a well-equipped four-channel amplifier to enhance your car audio system, drop by a local authorized AudioControl retailer and ask about the new Altitude Series A600.4. You can find a dealer near you using the locator tool on the AudioControl website.

Be sure to follow AudioControl on Facebook, Instagram and YouTube to stay up to speed with all their new products and solutions.

This article is written and produced by the team at www.BestCarAudio.com. Reproduction or use of any kind is prohibited without the express written permission of 1sixty8 media.

Filed Under: ARTICLES, Car Audio, PRODUCTS, RESOURCE LIBRARY Tagged With: AudioControl

  • 1
  • 2
  • 3
  • Next Page »

Recent Articles

ADS iDatalink Maestro APX Kits

Product Spotlight: ADS iDatalink Maestro APX Kits

February 2, 2026 

In February of 2025, Automotive Data Solutions (ADS) introduced the world to a new way of installing car radios. In their presentation, they discussed how aftermarket source unit … [Read More...]

A subwoofer and a list of its specifications

When it Comes to Subwoofer Specifications, Some Numbers Don’t Matter

February 1, 2026 

If you are a mobile electronics enthusiast like we are, then it’s quite possible that you enjoy reading product specifications. You can learn a lot about the design and application … [Read More...]

The steering wheel and dash of a vehicle

Basics of OEM Integration in Your Newer Vehicle

January 4, 2026 

Installing a mobile audio system involves much more than just hooking up some wires and driving in a few screws. Almost all vehicle manufacturers have realized that some amount of … [Read More...]

KICKER KEYLOC

Product Spotlight: KICKER KEYLOC

December 29, 2025 

There are a dozen or so high-quality line output converters available to help your installer integrate an amplifier into a factory-installed audio system. That said, most of them … [Read More...]

Testimonials

Dream Center

Very happy! 4 remote starts installed in 4 hours

Friendly and knowledgeable service!

We went in not knowing where to start on our electrical issues with a new vehicle. Not only was the issue identified and fixed, but Lee explained how things worked so we could understand now and in the future. We also got two sound systems installed and could not be happier. Would recommend 5sixty3 to anyone looking for quality work to be done on a vehicle!

Ford Ranger Trim Package

Lee and his company are not something I would have ever expected to find in Dubuque. His work is top notch. His knowledge is unmatched. His professionalism is just not something you see every day. I will be back with my next project!

Now Available!

Audio Dynamics

Audio Dynamics

At 5sixty3 Sound, we’re committed to bringing you the best in car audio, and that’s why we’re proud to offer the full line of Audio Dynamics … LEARN MORE

Location


Get Directions to 5Sixty3 Sound

Find Us

5Sixty3 Sound

3366 Center Grove Drive Suite 4
Dubuque, IA 52003
563-239-1931

Connect With Us

  • Facebook

Services

  • Car Audio
  • Custom Installation
  • Marine Audio
  • Remote Starters
  • Safety Cameras

Store Hours

Monday, Tuesday, Wednesday, Thursday, Friday10:00 am – 5:00 pm

Copyright © 2026 5Sixty3 Sound · Privacy Policy · Website by 1sixty8 media · Log in


Loading Comments...