5Sixty3 Sound

Dubuque's only High Quality Car Audio and Electronics Retailer and Installation Facility

3366 Center Grove Drive - Suite 4 - Dubuque, IA 52003 563-239-1931
  • Home
  • Services
    • Car Audio
    • Custom Installation
    • Marine Audio
    • Remote Starters
    • Safety Cameras
  • Brands
    • Audio Dynamics
    • Under Construction
  • About Us
  • Location
  • Contact Us
  • Facebook

Are Single or Dual Voice Coil Subwoofers Better?

Voice Coil
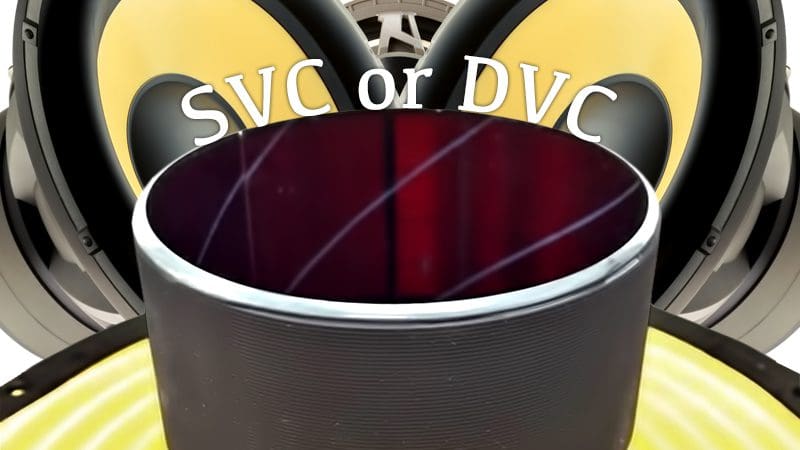
When it comes to buying subwoofers, a lot of people have questions or make assumptions about the benefits and drawbacks of single voice coil and dual voice coil versions. Understanding the differences between them requires a slightly enhanced understanding of how an amplifier works. We cover both topics in this article.

How an Amplifier Works

An amplifier is a simple device that takes an audio signal (from your radio, for example) and increases the voltage. That’s it.

You may (logically) be asking yourself, “Why do we call it a power amplifier?” We get an increase in power because the speakers we connect to the outputs of the amplifier have a low impedance. In car audio, we typically see loads between 1 and 4 ohms. This low impedance, combined with the increased voltage of the audio signal in the amplifier, causes relatively large amounts of current to flow through the voice coil of the speaker. This current flow causes a magnetic field and, subsequently, the voice coil moves toward or away from the magnetic field created by the stationary magnet on the speaker.

(OK, maybe this didn’t stay as simple as originally planned.)

Amplifier Load Determines Amplifier Power
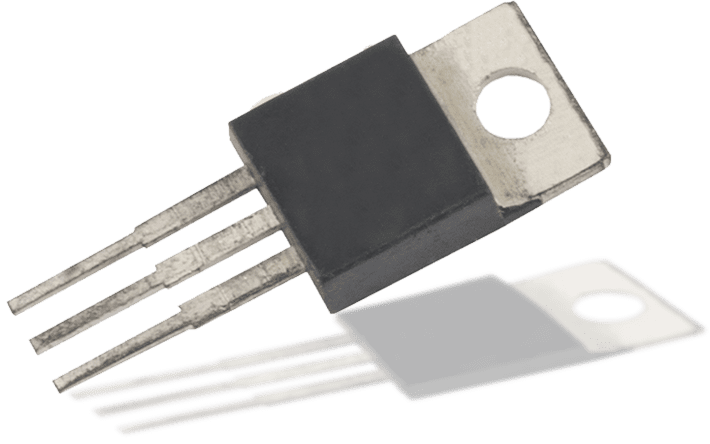
Voice Coil
Ohm’s Law Pie Chart
Let’s use an example of an amplifier that has a peak output voltage of 20 V. We don’t need to worry about the fact that this is an alternating current signal – we will examine this at a single point in time. With 20 V applied to our voice coil, let’s say we have a 4 ohm impedance on this coil. Ohm’s law states that a potential of 20 volts applied across a resistance of 4 ohms will result in 5 amp of current to flow. Using the equation P (Power) = Voltage x Current, we get 20 x 5, or 100 watts of power. If we change the impedance of the load to 2 ohms, we double the current to 10 amps, for a resulting power level of 200 watts.

If you look at the specifications for an amplifier, especially a subwoofer amplifier, you will see power ratings at different load impedances. In most cases, unless the voltage of the power supply in the amplifier is adjustable, amplifiers will make more power as the load impedance decreases.

What About These Subs?

Deciding which subwoofers to buy depends on the amp you are using and the number of subwoofers you are going to use. You want to choose a combination of subwoofers that will let you wire the voice coils together to an impedance that will allow the amp to make the power you want. Let’s look at several examples.

Example 1

Voice Coil
Images courtesy of JL Audio

We have the option of two different fictional subwoofers, each rated for 750 watts of continuous power handling. One subwoofer has a single 4 ohm voice coil. The other subwoofer has dual 4 ohm voice coils.

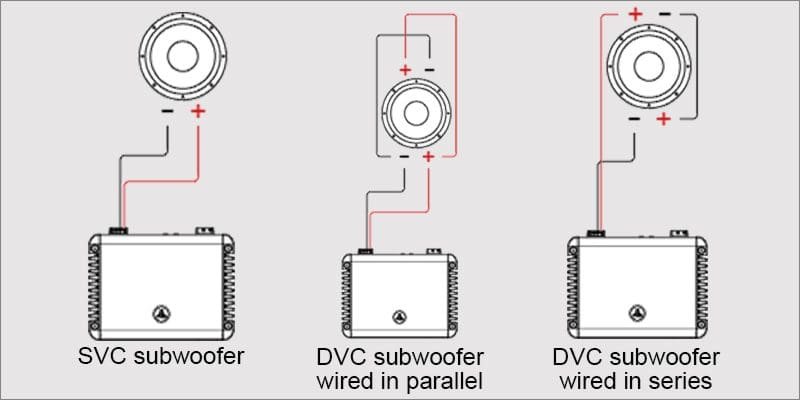
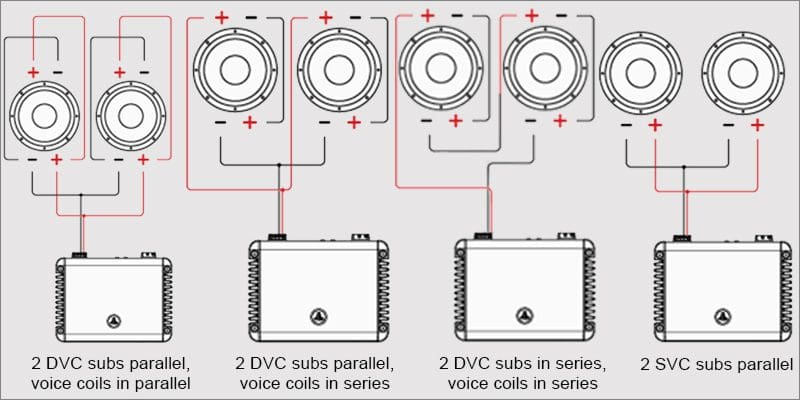
The dual voice coil subwoofer can have its coils wired in series to produce an 8 ohm load, or in parallel to produce a 2 ohm load. To complete this fictional example, we have an amplifier that will produce 400 watts into a 4 ohm load and 700 watts into a 2 ohm load. We have a small car and want to use a single 12 inch subwoofer in a large vented enclosure to get maximum low-frequency output. What sub should we use?

If we use the single voice coil subwoofer, the amplifier will not make full power in the 4 ohm load. We should use the dual voice coil subwoofer and wire the voice coils in parallel to present the amp with a 2 ohm load.

Example 2

Voice Coil
Images courtesy of JL Audio

In this example, we have the same electronic equipment, but the vehicle is a large SUV. There is a lot of room for subwoofers, and the owner wants to list to reggae, loudly. The owner has listened to a friend’s system and found out that a pair of subs matches his listening preferences perfectly. Which subs should we use?

If we use the dual voice coil subs, we have three options for wiring the four (two on each sub) voice coils together. We could wire all the coils in parallel. Parallel wiring will present the amp with a 1 ohm load. Most likely, the amp will go into protection because the load is too low. We could wire all the coils in series to present the amp with a 16 ohm load – but that’s not going to happen. We could wire the voice coils on each subwoofer in series, then parallel the pair of subwoofers to get a 4 ohm load. A 4 ohm load is not ideal.

If we use a pair of single voice coil subwoofers, however, and wire the subs in parallel, we get a 2 ohm load. Happy amp and happy customer!

Choosing and Wiring Subwoofers

  • Voice CoilYou can use as many subwoofers as you want on a single amplifier.
  • You must use all the voice coils on each sub. If you need a 4 ohm load but have a dual 4 ohm sub, using only one coil is going to cause issues. Bad issues.
  • Wire all the subwoofers you choose so the current going through each subwoofer is the same. In most cases, this means using pairs of subs. In the past, several companies offered dual 6 ohm voice coil subs that could be wired in groups of three to present amplifiers with standard load impedances of 1 or 4 ohms.

Do not wire one dual voice coil subs in series and one in parallel before connecting the subs together in parallel. You will get more current through the (parallel) low-impedance subwoofer. This imbalance will upset the performance of the enclosure and wreak havoc with the reliability and quality of your system. This is unrelated to the wiring of multiple subwoofers, but: Don’t mix and match different subwoofers. Each has its enclosure requirements and response characteristics. There is no way to guarantee that the output of two different subwoofers will sum positively at all frequencies.

So, Which Voice Coil Configuration Is Better?

The answer to the question “which is better” is neither. SVC and DVC subwoofers are simply two different options when buying. They are analogous to a tire manufacturer offering different-sized tires for different vehicles – there is an application for each.

Adding a subwoofer system should be one of the very first things you do to upgrade a factory audio system. When you are ready to make the leap into the realism, impact and dynamics that a great subwoofer can add, drop by your local car audio specialist retailer. They would be happy to work with you to design a system that meets your performance expectations.

This article is written and produced by the team at www.BestCarAudio.com. Reproduction or use of any kind is prohibited without the express written permission of 1sixty8 media.

Filed Under: ARTICLES, Car Audio, RESOURCE LIBRARY

What Is Signal-To-Noise Ratio, And Why Does It Matter?

Signal-To-Noise RatioMost people understand the importance of amplifier power specifications. In most cases, more power is a good thing, that is, until you reach the thermal or suspension limits of the speakers you are using. One specification that is also very important in a mobile electronics amplifier, processor or source unit is Signal-to-Noise Ratio. In this article, we are going to explain what S/N Ratio numbers are and why they are important.

All the Noise, all the Time!

Signal-To-Noise RatioIt just so happens that when you pass a signal through any device – like a piece of wire, resistor, capacitor, inductor, transistor or anything else you can think of – a tiny little bit of noise is added to the signal. There are many different kinds of noise. The random motion of electrons bouncing around as they pass through a device causes thermal noise. Higher temperatures result in more noise. Another common noise is Shot Noise. The difference in arrival times of electrons as they cross a barrier or gap between two materials causes Shot Noise. Devices like transistors and diodes, which have different layers of materials inside, are common sources of Shot Noise. There are many more types of noise.

As you can imagine, the amount of noise generated by any one of these devices is minuscule. When you add up a little bit of noise from a bunch of components, then you amplify the resulting signal, the amount of noise in the output of a circuit grows dramatically.

Noise happens in source units, signal processors and amplifiers. Once you add noise to the signal chain, it’s essentially impossible to remove it.

The Sound of Noise

Signal-To-Noise RatioAn easy way to hear what noise sounds like is to connect a set of headphones to your laptop computer and turn the volume up fairly high. You’ll hear a hiss through the headphones. That’s noise. (Note: Please be careful, we want you as an audio enthusiast for life. Take those headphones off before your computer plays a sound and you risk damaging your hearing.)

How We Measure Noise

Signal-To-Noise RatioThere are a few ways to quantify the noise an electronic component creates. One method is to simply state the noise on the output of the device in absolute terms. The measurement could be in volts or watts, and quantifies the amplitude of the noise signal. You won’t see this used to describe audio components, however.

The most common method of quantifying the noise that a product adds to the signal is to compare the noise level to that of the audio signal coming out of the device. Because the difference in these levels can be quite large, we state the ratio of the signal level to the noise level using the decibel (dB) scale. The decibel scale is logarithmic. As such, a difference of 6 dB represents a doubling of the amplitude ratio, 20 dB is ten times the amplitude, 40 dB is 100 times, 60 dB is 1000 times and 80 dB is 10,000 times and so on.

Let us look at a moderate quality amplifier – nothing awesome, nothing disastrous. We see that this fictional amplifier has a S/N Ratio of -82.3 dB when referenced to 1 watt of power output into a 4-ohm load. What does that mean? Well, first, we know that to produce 1 watt of power into a 4-ohm speaker, we need 2 volts RMS of signal coming out of the amp. Our noise level is 82.3 dB quieter than 2 volts. Using an online calculator, that means that the noise produced by this amp is 0.00006918309709189363 times smaller than 2 volts, so it’s about 0.000138 volts. A little more math and that works out to 4.785 nanowatts.

Nope. That isn’t very much noise. And in most cases, you probably can’t hear it.

What if we work hard and find a below-average amplifier? Something with a S/N spec down around 70 dB? If we apply that math to our 2 volts of rated output, we get a noise level of 99.99 nanowatts. Yep, that’s a LOT more watts as compared to the previous example.

Clarifying the Mysterious Signal-To-Noise Ratio

If you look at an amp spec from more than about 10 years ago, or you see a number that is abnormally high, they may be rating the noise level using the maximum output capability of the amplifier as the comparing factor. If we measure an amplifier’s noise output level at 1 watt to be 85 dB, then you increase the amplifier’s output to 10 watts, assuming it doesn’t make any additional noise, the S/N ratio will be -95 dB. If the amp can produce 100 watts with no more noise, the ratio is now -105 dB. There are hundreds of amps that can produce 1000 watts – so that noise ratio measurement would now be -115 dB. When it comes to printing numbers on a gift box, in a brochure or publishing them on a website, being able to say that the S/N Ratio is -115 dB sure looks more appealing than -85 dB.

Signal-To-Noise RatioThe CEA-2006 specification established a standard set of guidelines for S/N Ratio noise measurement. The specification dictates that we measure the S/N Ratio compared to 1 watt of output into a 4-ohm load. A new specification is in the works that will help quantify the adjustment of the sensitivity setting on the amplifier during the measurement process. As it sits, the lower the setting of the amp, the better the S/N ratio measurement will be. Want to confirm this? Next time you are installing an amp, turn the system on with no signal connected to the amp and listen to the speakers. Then turn the amp gain up all the way. You will hear the noise level increase. Please turn the gain back down and shut the system off before proceeding.

Why is the Lack of Noise Important?

How can we quantify the desire not to add noise to our signal? Here is a simple analogy. If you purchased a TV in recent years, you may have heard the expression ‘blacker blacks.’ ‘Blacker blacks’ refers to how dark the screen gets when there is no signal. Blacker is better. When you think about your audio system, a ‘more negative’ S/N ratio means that the noise is quieter than the audio signal. We don’t want to listen to noise. -90 dB is better than -80 dB. Go it? Clear?

There are so many criteria to balance when choosing any car audio product. Power levels, efficiencies, distortion characteristics, features and functions all play an important role. Understanding the meaning of the S/N ratio measurement is very important. We don’t want ANY distortion or noise added to our music, but the laws of physics deny us that luxury. Do your best to choose products that, through careful design and choice of internal components, minimize these negative effects. Your local mobile electronics specialist can help steer you towards some amazing equipment. Drop in and check out what’s new.

This article is written and produced by the team at www.BestCarAudio.com. Reproduction or use of any kind is prohibited without the express written permission of 1sixty8 media.

Filed Under: ARTICLES, Car Audio, Classic Car Audio, RESOURCE LIBRARY

Choosing Speakers For Your Car: Components Or Coaxials?

Choosing SpeakersDeveloping a speaker requires that the designer and engineer balance many different aspects, such as the application, cost and desired performance level of the end product. For the consumer, navigating the thousands of different speaker offerings on the market can be difficult. Two speakers can measure similarly regarding efficiency, power handling and frequency response, but still perform completely differently because of different distortion characteristics. Cone, dust cap and suspension resonance, motor non-linearity, and enclosure/application requirements play a crucial role in determining how the end-product will sound once installed in the listening environment. This article scratches the surface of looking at the benefits and drawbacks of choosing speakers by comparing coaxial and component speaker designs.

When Choosing Speakers, Define the Design

Choosing SpeakersComponent (or separate) speakers are a set of speakers that includes a set of dedicated midrange drivers and dedicated tweeters. Each of those four speakers requires a dedicated mounting location. By contrast, a coaxial speaker features a midrange driver with a tweeter mounted in the center of it. In most cases, the tweeter is on top of an extension post connected to the pole piece. Other coaxial designs use a bridge or mesh grille to suspend the tweeter over the midrange. These are sometimes called coaxially mounted components by marketing departments.

Benefits of Coaxial Speakers

In most cases, coaxial speakers are the less-expensive options in a product lineup. This pricing is due to the chosen target customer and not because you can’t make a high-quality coaxial speaker. Less-expensive magnets, baskets, cone materials and suspension components, and wider tolerances that allow for faster production with fewer rejected assemblies, all help reduce cost. The benefit is, if you need an inexpensive speaker, coaxials are a good solution.

Coaxial speakers can be installed faster, so they are less expensive to install. The integrated tweeter saves a lot of time during the installation process. Most coaxial speakers have integrated crossovers of some sort that don’t require special wiring or mounting. The net result is that your installer can get them up and running in your vehicle in about half the time it takes to install a component set, which means your labor charges will be reduced.

Benefits of Component Speakers

Most component speakers are made from better materials and have higher performance goals. High-end components can cost more than $5,000 for a set and often include premium passive crossover networks, elaborate installation accessories and – of course – amazing speakers. The sound that component speakers produce, when installed and tuned properly, can be amazing!

When a good set of components is tuned properly, most of the sound can appear to come from the tweeters. Having a separate tweeter allows your installer to mount it high in the vehicle – at the top of the door, on the dash or in the A-pillar. The combination of proper tuning and placement puts the music out in front of you, essentially at eye level. This higher soundstage is similar to what you would experience at a concert, listening to the band performing in front of you.

Choosing SpeakersMany factors contribute to where and how your installer mounts the tweeters – your budget, your performance goals, and how much modification you want or will allow to your vehicle. All locations have their benefits and drawbacks. For example, a tweeter mounted on the dash or A-pillar is very near the windshield. The hard surface of the windshield can cause significant reflections. Alternatively, a mounting location in the upper section of the door may reduce these reflections, but may not raise the soundstage as high, or could make it appear to come from somewhere closer to you than the dash or pillar location.

A component speaker doesn’t have any of its output blocked by the tweeter, which eliminates some minor reflections . Likewise, with a coaxial speaker that uses a tweeter post, a component speaker can have a full dust cap. The dust cap moves with the cone and increases the driver cone area. Additional cone area increases the driver’s efficiency.

The Huge Role of Crossovers

Choosing SpeakersWhether you choose a coaxial or component speaker set, you are going to need a crossover to handle splitting up the frequencies. In the most basic of speakers, a capacitor is used on the wire going to the tweeter to block low and midrange information. The midrange driver is allowed to roll off naturally – ideally, there are no significant high frequencies resonances that will affect the sound.

As you progress up through the quality of a speaker set, you will see steeper filter networks on tweeters. These steeper networks allow the tweeter to play to a lower frequency and then be stopped to protect it from excursion damage. At the same time, filtering the high-frequency output of the midrange is common in mid- to high-end crossover networks. Speaker manufacturers construct the most elaborate of crossover networks with premium components for both the high- and low-pass portions of the network. Adjustability is often built into the crossover for tweeter level. Small components can be overdriven and saturated, reducing their effectiveness. Large amounts of distortion can cause the tweeter cap to overload and explode.

The Option of Coincident-mounted Coaxial Speakers

Choosing SpeakersThe radiation pattern of a speaker is a sphere in its standard operating range. As frequency increases, this output pattern becomes more directional. When a tweeter is mounted at the base of a midrange, a phenomenon occurs called Intermodulation Distortion. As the cone of the midrange moves up and down to reproduce music, this moving surface modulates the reflections of the tweeter.

It is worth noting that the same thing happens when a single speaker cone is asked to reproduce high frequencies: The source of the high-frequency sounds moves forward and rearward as the speaker cone attempts to reproduce lower frequencies. This modulating effect is known as Doppler Distortion. These distortions, combined with the narrowing of the radiation pattern as frequency increases, are some of the many reasons why we have to use different-sized speakers to reproduce music accurately.

When shopping for a coaxial speaker, you will want to choose one that has the tweeter mounted low enough not to interfere with the installation of a grille or trim panel over top of the speaker. You should also look for a tweeter that has a small waveguide that prevents the output from bouncing off the midrange cone.

Shopping for Speakers

We could spend years discussing the different aspects of speaker design and performance. Suffice it to say that you should seek out the assistance of a seasoned and reputable professional for purchase and installation. Be sure to quantify as much of the purchase process as possible – your financial limits, cosmetic preferences regarding installation and performance goals for the system. You will want to use music you have listened to many times when auditioning speakers.

You may want to listen to both a set of more- and less-expensive speakers to help quantify the price point you have chosen. Finally, talk with the salesperson and, if possible, the installer about how and where the speakers will be installed. Be sure to ask about sound deadening, spacers, wiring and anything else that can affect the performance of the installed speaker.

Speaker shopping is a lot of fun, and getting new speakers for your car, truck, boat or motorcycle can be very exciting. Be patient – take your time and be thorough. You will enjoy your new purchase all that much more when you choose a great-sounding speaker and a skilled installer.

This article is written and produced by the team at www.BestCarAudio.com. Reproduction or use of any kind is prohibited without the express written permission of 1sixty8 media.

Filed Under: RESOURCE LIBRARY, ARTICLES, Car Audio

The Importance Of Proper Car Audio Speaker Installation

Speaker InstallationThe speakers in your mobile entertainment system are one of the most critical components in determining how your system sounds. If you choose poorly designed speakers that have distortion issues from poor cone, suspension or motor design, no amount of signal processing can make your system sound great. The methods used to install your speakers are as important as the design of the speakers themselves. In this article, we are going to look into some of the common mistakes that occur during speaker installation and how to maximize the performance of your speakers.

Speakers Need A Stable Foundation

Speaker InstallationIf you want to listen to a record player, you want the unit to be on a solid table or stand. You’d never try to hold the turntable on your lap – the needle would jump and bound all over the place. When it comes to speakers, you want all the energy from the motor to move the speaker cone and not the basket. Why would the basket move? Newton’s Third Law of Motion states: When one body exerts a force on a second body, the second body simultaneously exerts a force equal in magnitude and opposite in direction on the first body.

When the voice coil pushes the speaker cone out, the inertia of the cone is also pushing back on the fixed magnet. If the speaker isn’t mounted securely, it will buzz, vibrate and otherwise move around. These vibrations cause all manner of distortion.

Look at a set of high-end home audio speakers. Years ago, Linn had a set of narrow floor-standing speakers that used a pair of small midrange drivers, roughly 4.5 inches in diameter. The front baffle of the speaker enclosure was 1.5-inch thick MDF. If you knocked on it with your knuckles, it sounded like concrete. And yes, those speakers sounded excellent!

Speaker Installation – Consider Mass

To combat the forces generated by the moving speaker cone, you will want to consider beefing up the mounting surface. In the case of a subwoofer enclosure, an extra-thick front panel can help. Vertical braces on either side of the speaker mounting surface help even more. The best solution is to run full-size braces from the front of the enclosure to the rear. Full depth braces lock the front and rear panels together and add dramatic strength to the speaker mounting surface. These braces also control vibrations in the rear panel to improve performance further.

For a smaller speaker such as midrange or midbass driver in a door, adding strength is a little more difficult. The most common practice is to add a layer or two of butyl damping material (sound deadening) to the metal around the speaker. You can even add a layer or two on the inside of the door skin if you are concerned about thickness. Damping materials with an aluminum layer add a little extra mass.

Speaker Installation
These plastic speaker adapters by the crew at Mobile Edge will last the life of the vehicle.

If your installer is constructing a set of speaker mounting adapters, then ask if they are using a material that has some mass to it. HDPE and ABS are good; acrylic is even better. A material like Corian – the DuPont countertop material – is fantastic. You can easily cut and shape Corian and glue parts together with Cyanoacrylate (Crazy Glue). You may want to use thread inserts or t-nuts with all of these materials. While it is readily available and easy to work with, don’t use wood for speaker adapters inside doors – it will get wet, swell up and deform. It can also hold water and get moldy.

Speaker Installation – Location Matters

Speaker Installation
This enclosure, by Handcrafted Car Audio is perfect for maximizing the bass output without taking up any usable hatch space.

If your audio system is going to use factory speaker locations, most of the time these are acceptable to provide an unobstructed output path to the listening area. The last thing you want to do is block the output of the speaker by putting something in front of it. Keep magazines, books, paper and other objects from piling up in front of, or on top of, your speakers.

For subwoofers, the location of the sub has a dramatic effect on how it sounds. You want the energy from the subwoofer to be able to mix with the sound from your midbass speakers as easily as possible. For this reason, hatchbacks and SUVs are great for bass. If you have a sedan, then firing the output of your subwoofer through a ski pass-through works well. You can get away with firing subs into the trunk of a sedan, but you will want to ensure that your midbass drivers can play fairly low – say 75 Hertz or so – to ensure that you don’t lose impact and dynamics.

Back-Wave Cancellation Problems

We use speaker enclosures for two primary reasons – to limit the movement of the speaker cone and to prevent the sound coming from the rear of the speaker cone from canceling out the sound coming from the front. You need to prevent the rearward sound from mixing with the front. For midrange speakers, this means building good quality mounting adapters. Your installer can also use sound-deadening materials to seal up openings in the interior skin of your door panels. You will get better speaker performance with proper back-wave management than you will just buying better speakers.

Weather Protection Ensures Longevity

Speaker Installation
In another Handcrafted Car Audio installation, they were fortunate enough to have room to build a sealed enclosure for these midrange speakers.

When mounting speakers in a door panel, it is inevitable that the back of the speaker will get wet. The interior of doors are not completely watertight, and this poses a challenge for installers. Creating an enclosure out of a water-resistant material would be the perfect option, but there is rarely enough mounting depth and it is difficult to create an enclosure that is large enough not to affect the performance of the speaker. For many years, installers have used foam ‘hats,’ cut in half to protect the top of the speaker from direct exposure to drops from the window seal. These are a good option. A thick foam gasket mounted behind the speaker mounting surface can also help. Companies like SoundSkins and F.A.S.T. Rings have ready to apply pre-cut solutions.

There are dozens of other considerations when it comes to having your speakers installed. The most important task for you is to partner with a retailer that does high-quality work and has an excellent reputation. Choosing great speakers for your car audio system is a lot of fun. Hearing them perform up to their potential is even better.

This article is written and produced by the team at www.BestCarAudio.com. Reproduction or use of any kind is prohibited without the express written permission of 1sixty8 media.

Filed Under: RESOURCE LIBRARY, ARTICLES, Car Audio

Digital Signal Processors Take Your Audio System To The Next Level

Digital Signal ProcessorsAdjusting or modifying audio signals is nothing new. Analog signal processors have been around recording studios and live performances for decades. Everything from equalizers to crossovers and compressors were conceived back when vacuum tubes were popular. As technology advanced, the size, cost and complexity of signal processors decreased. Now, many car audio source units contain more processing power than early recording studios. This article looks at digital signal processors (DSPs), what they do and why you need them.

A Hostile Environment

Digital Signal ProcessorsIf we were to take a full-range home speaker into an open field and measure the frequency response, we’d see a fairly flat and smooth response curve. If you take that same speaker into a small room and measure the response again, you will see peaks and dips at various frequencies. This change in frequency response is not caused by the speaker, but by the room itself. Reflections cause nodes and anti-nodes (peaks and valleys) that dramatically affect the perceived frequency response of the speaker system. To maximize our enjoyment of that speaker, we need to apply signal correction to the speaker so what we hear is similar to what we would have experienced in that field.

In a car, we are very rarely able to sit directly in the middle of the left and right speakers. The driver is usually twice as far from the right speaker as from the left. We hear the output of the left speaker first and it seems as if that speaker appears to be playing louder – because it is closer. Keep this in mind as we discuss digital signal processors (DSPs).

Speaker Limitations

No single speaker can reproduce the entire audio spectrum from 20 Hz to 20 kHz with accuracy, detail and even dispersion of sound. Even if there were one that could do this, the distortion levels in the midrange and high-frequency sounds would still be high because of the excursion requirements of the speaker at low frequencies. Because of this, we make use of several different speakers to cover the audio band. Woofers or subwoofers cover the bass, and typically play up to 80 or 100 hertz. Midrange drivers cover the range from 100 Hz to around 4,000 Hz. Finally, we use tweeters to cover the remainder of the frequencies above 4,000 Hz. While these are approximations, they are common crossover points for these speakers.

A crossover is a device that limits the passing of audio signals. There are two common types used in car audio: high-pass and low-pass. Their name describes their function. A high-pass crossover allows frequencies higher than the crossover point to pass through, and a low-pass allows frequencies below the crossover point to pass. A high-pass crossover would be used to keep the deep bass out of a small door or dash speaker, while a low-pass crossover is used to keep midrange and high-frequency information out of a subwoofer. We can combine both kinds of crossovers to produce what is known as a bandpass crossover – we limited the low- and high-frequency information. We would use this on a midrange speaker when combining it with a woofer and a tweeter. (We will discuss crossovers in detail in another article.)

Digital Signal ProcessorsIn car audio, we use both active and passive crossovers. Passive crossovers are a combination of capacitors, resistors and inductors that we connect to the speaker wires between the amp and the speaker. The behavior of the components, and how they are configured, limits what frequencies are allowed to pass through to the speaker.

An active crossover is an electronic device that affects the frequency response of the signal before the amplifier. The benefit of active crossovers is that it is easy to adjust them to different frequencies. Most, if not all, crossover components have to be replaced to adjust the crossover frequency of a passive network.

This information gives us a basic understanding of why we need signal processing. For decades, the mobile electronics industry survived and thrived using analog processing. Companies like AudioControl, Phoenix Gold, Rockford Fosgate and Zapco made equalizers and crossovers, and enthusiasts flocked to them like moths to a flame.

As computing power advanced, we saw products like the Rockford Symmetry appear. The Symmetry was an electronically controlled analog processor – a fantastic creation that allowed users to make many adjustments from a single computerized control panel.

The next evolution in signal processing was to do everything in the digital domain, instead of analog. How does that work?

Building Blocks

A DSP is a powerful audio signal processor with hardware and software that is optimized to perform high-speed processing in real time. Some of the less-expensive processors include the analog-to-digital and digital-to-analog converters within the chip itself. On the higher-end units, the analog converters are external components. Better D/A converters offer increased resolution and improved signal-to-noise ratio performance. Once the audio signal is in the digital domain, one DSP doesn’t vary much from another. Algorithms are written in a similar fashion for filtering, equalization and time alignment.

Why would we want a DSP and not an analog processor? In a DSP, there are no associated concerns about component tolerances or temperature variations that will affect the response of the processing. With the right interface, users can access different system presets quickly and store an unlimited number of configurations on their computers. Most DSP units don’t include any analog adjustments, like potentiometers or switches, which can get dirty or wear out over time. Vibrations that could lead to component failure in an analog system rarely affect DSPs.

Features of Digital Signal Processors

Once an analog signal is converted to digital, the available signal processing is limited only by the software that is written for the chosen unit. The limit on the features of the software is typically determined by the available memory of the processor itself. It takes space to store the program, and additional space to store the converted analog information as the processor works with the information. When you see one processor with more features than another, the difference is usually a memory limitation.

Inputs And Signal Summing

Digital Signal ProcessorsMost DSP units on the market can combine and adjust the level of audio signals on the input to the DSP. If you have a radio with front, rear and subwoofer outputs, you may want to maintain all of these channels discretely as you process the audio signal.

What about when you are trying to integrate with a factory amplifier? Perhaps you have a front door midrange and tweeter output from an amplifier that you need to use for your new front speakers. Most digital signal processors will allow you to combine signals from multiple inputs to facilitate applications like this.

Since different sources have different peak voltage levels, the inputs to your DSP have adjustable sensitivities. Just like the gain control on an amplifier, we want to set the input gains on our DSP to maximize the signal-to-noise ratio of the processor.

Crossovers And Filtering

Digital Signal ProcessorsAs we mentioned, different size speakers are designed to focus their performance within different audio ranges. A 3-inch midrange will not play the same frequency range as a 1-inch tweeter or a 6.5-inch woofer. We use the crossovers in the DSP to divide up the frequencies sent to each output and speaker.

A benefit of doing all the crossover processing in the digital domain is that many digital signal processors offer different crossover filter alignments and roll-off slopes. The alignment describes the shape of the roll-off around the -3 dB point. This shape also affects how signals sum back together acoustically. Options are Butterworth, Linkwitz-Riley, Chebychev, Bessel and more. It’s not that one is better than another, but that each is distinct and different. We could write an entire article about crossover alignments.

The crossover slope describes how fast the audio stops playing as a signal moves away from the crossover point. Because it’s all digital, most digital signal processors offer slopes from -6 dB to -48 dB per octave, in steps of 6 dB or 12 dB, depending on the chosen alignment. In most cases with DSPs, 24 dB/Octave Linkwitz-Riley filtering works quite well, but there are dozens of different tuning approaches, so use what works well for you.

Time Alignment And Signal Delay

One of the coolest features of a digital signal processor is its ability to store the audio signal for a variable amount of time before sending it to the speaker. This storage ability allows a properly trained installer to delay the signal going to the speakers closest to the listener so the sound from created by them arrives at the listening position at the same time as the rest of the speakers. For four-way systems (subwoofer, midbass, midrange and tweeter), this setup and fine-tuning can take a little time.

Equalization

Digital Signal ProcessorsThe ability to fine-tune the frequency response of each speaker in an audio system is a huge key to making that system sound amazing. We have to measure the response of each speaker at the listening position, then adjust the equalizer so each speaker produces a smooth response. There are many ways to achieve this.

Graphic equalizers typically offer 31 bands of equalization per channel and are spaced 1/3 of an octave apart. This spacing usually provides enough frequency resolution to resolve response issues. Graphic equalizers are easy to understand: You pick the desired frequency band, then boost or cut the signal by the amount of your choice.

Parametric equalizers are much more powerful, but can be a little more difficult to configure. In a parametric equalizer, the user can choose the frequency, bandwidth and amount of signal boost or reduction. Understanding the selection of frequency is simple, but understanding filter Q factor is more difficult. When it comes to Q, the basic concept is that a higher number means that the band adjustment affects a narrower range of frequencies. A low number, like 0.7 or 1, covers a wider range of frequencies. Setting up a parametric equalizer accurately takes some practice. That said, some software applications will provide setting information automatically after you measure the frequency response of the speaker or system.

Output Level And Remote Controls

Digital Signal ProcessorsHaving the ability to tune the output level of each speaker finely is critical to the performance of an audio system. To achieve an accurate and balanced soundstage, the amplitude (level) of each speaker in the system must be adjusted very accurately. Output level control is also quite important to matching the efficiency of the different speakers.

Many DSP units have the option of a remote control. These controls can be used to adjust the overall system volume and adjust the subwoofer output level, and can typically load presets for the processor. More advanced controllers give you access to some of the system tuning features, allowing you to make adjustments without the need for a laptop computer. Displays on these remote controls vary from simple single-color dot-matrix LCD panels to full-color OEL displays that are easy to see in bright sunlight.

Digital Signal Processor Tuning – Art Or A Process?

There are many schools of thought about how to configure a DSP. Whether you do it using instrumented measurements or different acoustic techniques, we want to achieve proper protection for the speakers, smooth frequency response from both channels of the audio system and aligned arrival times from each speaker.

Many car audio manufacturers train their dealers in different methods of achieving a great “tune” on their customer vehicles. If you are looking to improve the sound of your mobile entertainment system and already have great speakers and amplifiers, visit your local car audio professional. They would be happy to demonstrate the benefits of DSPs, and provide you with the information you need to make an educated decision about buying one.

This article is written and produced by the team at www.BestCarAudio.com. Reproduction or use of any kind is prohibited without the express written permission of 1sixty8 media.

Filed Under: RESOURCE LIBRARY, ARTICLES, Car Audio

  • « Previous Page
  • 1
  • …
  • 4
  • 5
  • 6
  • 7
  • 8
  • 9
  • Next Page »

Recent Articles

One term that has been over-abused in the mobile electronics field lately is Bluetooth. This article explains what Bluetooth is, and how it is used.

What is Bluetooth?

March 1, 2026 

If you have been around the mobile electronics industry for any amount of time, you will know that certain terms are often used incorrectly. One term that has been over-abused … [Read More...]

ADS iDatalink Maestro APX Kits

Product Spotlight: ADS iDatalink Maestro APX Kits

February 2, 2026 

In February of 2025, Automotive Data Solutions (ADS) introduced the world to a new way of installing car radios. In their presentation, they discussed how aftermarket source unit … [Read More...]

A subwoofer and a list of its specifications

When it Comes to Subwoofer Specifications, Some Numbers Don’t Matter

February 1, 2026 

If you are a mobile electronics enthusiast like we are, then it’s quite possible that you enjoy reading product specifications. You can learn a lot about the design and application … [Read More...]

The steering wheel and dash of a vehicle

Basics of OEM Integration in Your Newer Vehicle

January 4, 2026 

Installing a mobile audio system involves much more than just hooking up some wires and driving in a few screws. Almost all vehicle manufacturers have realized that some amount of … [Read More...]

Testimonials

Dream Center

Very happy! 4 remote starts installed in 4 hours

Friendly and knowledgeable service!

We went in not knowing where to start on our electrical issues with a new vehicle. Not only was the issue identified and fixed, but Lee explained how things worked so we could understand now and in the future. We also got two sound systems installed and could not be happier. Would recommend 5sixty3 to anyone looking for quality work to be done on a vehicle!

Ford Ranger Trim Package

Lee and his company are not something I would have ever expected to find in Dubuque. His work is top notch. His knowledge is unmatched. His professionalism is just not something you see every day. I will be back with my next project!

Now Available!

Audio Dynamics

Audio Dynamics

At 5sixty3 Sound, we’re committed to bringing you the best in car audio, and that’s why we’re proud to offer the full line of Audio Dynamics … LEARN MORE

Location


Get Directions to 5Sixty3 Sound

Find Us

5Sixty3 Sound

3366 Center Grove Drive Suite 4
Dubuque, IA 52003
563-239-1931

Connect With Us

  • Facebook

Services

  • Car Audio
  • Custom Installation
  • Marine Audio
  • Remote Starters
  • Safety Cameras

Store Hours

Monday, Tuesday, Wednesday, Thursday, Friday10:00 am – 5:00 pm

Copyright © 2026 5Sixty3 Sound · Privacy Policy · Website by 1sixty8 media · Log in


Loading Comments...